An interesting (and often overlooked) part of software development is to know your way around the underlying hardware—sometimes it’s neat to know why we use RGB for colors or why computers like binary data so much. So while my day job revolves mainly around software, every once in a while I sneak in a little electronics project to learn about this fascinating topic (search for “how electricity actually works”—you’re in for a treat).
This brings us to that time I retrofitted my doorbell so it connects to the Internet. There were definitely some interesting learnings, but I also ran into a couple of nasty problems in the process; I decided to write it down for entertainment, my future self, and the odd chance of someone else facing similar problems.
Motivation
My background in Internet-connected doorbells goes way back to 2016 when my flatmate and I tried to come up with a way to buzz ourselves into our apartment building because we constantly forgot our keys. We came across a product which could be connected to a regular doorbell intercom to trigger the door buzzer and to send mobile notifications when somebody rang the doorbell. While the product did exactly what we needed, for some reason we ended up never buying it.
Fast-forward to last week.
Due to some planned renovation work at my two-(soon-to-be-three-)apartment house, I did some research around whether to get a new doorbell/intercom system or whether to simply keep the ~15 year old video intercom system (and buy a third intercom unit for the top floor).
On the one hand, the existing solution still did its job and—according to the manufacturer’s website—was still recommended for my situation; on the other hand, I recently upgraded the network infrastructure in my house and was looking for any excuse to expand it, like via an Ethernet-powered intercom system (I could access remotely to buzz myself in) or some kind of video surveillance for the front door (to check for deliveries).
Shortly after starting my research, I realized that network/Internet-connected doorbells/intercoms for small multi-tenant buildings with a shared front door are simply not a thing (and also that small multi-tenant buildings with a single front door don’t seem to exist outside of Europe). There are products like Ring that are basically just a button with a camera. Give me a minute to rant:
- there’s no way to ring a second/third flat (short of mounting several doorbell units next to each other 🙄)
- there’s no way to trigger the door buzzer (though some can connect to a smart lock 🤷)
- many models expect you to answer the door with your mobile phone; I honestly think a wall-mounted intercom unit is a must—how else would guests or children be able to answer the door?
There are also product lines like DoorBird, which seem to do the multi-tenant part right, but cost an eye-watering €2,500 plus installation for three apartments. Consequently, I decided to keep the existing system, but to try to expand its capabilities 🪛.
Retrofit solutions
The retrofit solutions I came across all have a similar look and feature set: They’re all small wall-mounted boxes connected to the intercom via a cable. They’re all able to buzz open the door and to send notifications to mobile phones when somebody rings the doorbell. They also offer varying degrees of sharing features to allow other people to buzz open the door as well. Here’s an excerpt of products:
- nello. This German company is actually the brand my flatmate and I considered back in the day. It’s about €100 and does everything I needed, I’ve could have just gotten three of them and finish the blog post here. In fact, it’s the only product I found that stated official compatibility with my intercom model. I also like that it’s powered directly by the intercom and not a bunch of batteries (mild foreshadowing 🌩️).
- Nuki Opener. An Austrian company (yay 🇦🇹) mainly selling smart locks. They offer a product similar to nello, but it seems they’ve tried to shoehorn it into their existing smart lock ecosystem: the €130 Nuki Opener needs to connect via Bluetooth to an extra €99 Nuki Bridge unit, from which, judging from the range Bluetooth can achieve, I needed at least two of—I guess that’s fine if you already have a Nuki smart lock and you need the bridge anyway 🤷. Also, the intercom unit is powered by batteries (I try to avoid battery-powered devices whenever possible; however, if you believe Nuki’s marketing copy, there’s apparently a thing called “power theft” which can make landlords sad and may prohibit you from tapping into the intercom’s power). I never found out whether the Nuki can also be powered directly from the intercom because their compatibility checker rejected my model.
- Ring Intercom. Ring also mainly offers doorbells (see rant above), but recently (to my surprise, given that it’s a US brand) introduced an intercom retrofit product. The €130 Ring Intercom even boasts two-way audio so you can answer the door remotely. However, according to their website, there’s no official compatibility with my model either. Also, it’s powered by proprietary batteries, but at least they are rechargeable and the same kind that Ring smart locks use.
What’s compatibility, anyway?
Weighing my options, I noticed that none of the solutions I found actually offered any kind of technical specifications on their website, just a boring compatibility lookup that only told you yes or no, but not why. nello was the only product claiming compatibility with my intercom, but technologically, nello is not that different from the others—maybe the others were also compatible but just didn’t have my intercom model in their database 🤔. Some research took me to this support article from Nuki, where I found out that the brand of my intercom, TCS, actually requested to be removed from their compatibility database (presumably to stop people from tinkering with their products). That’s when I called 🐮💩 on compatibility lookups and gave the situation some more thought: from a product development perspective, the existing retrofit solutions have to cover a huge specification surface! I’m no expert, but let’s say there’s five common voltage standards (both AC and DC of course), there’s old analog wiring and not-so-old digital bus systems (with different communication standards), there’s audio-only and video transmission, and of course there are situations where you can’t draw power from the intercom because of sad landlords. Think of all the software, electronics, and batteries necessary to make one product that supports all these different specifications 🤯. At this point, the software developer in me asked: Why not just start with the actual specification and come up with my own custom solution? 😏
Getting the specifications
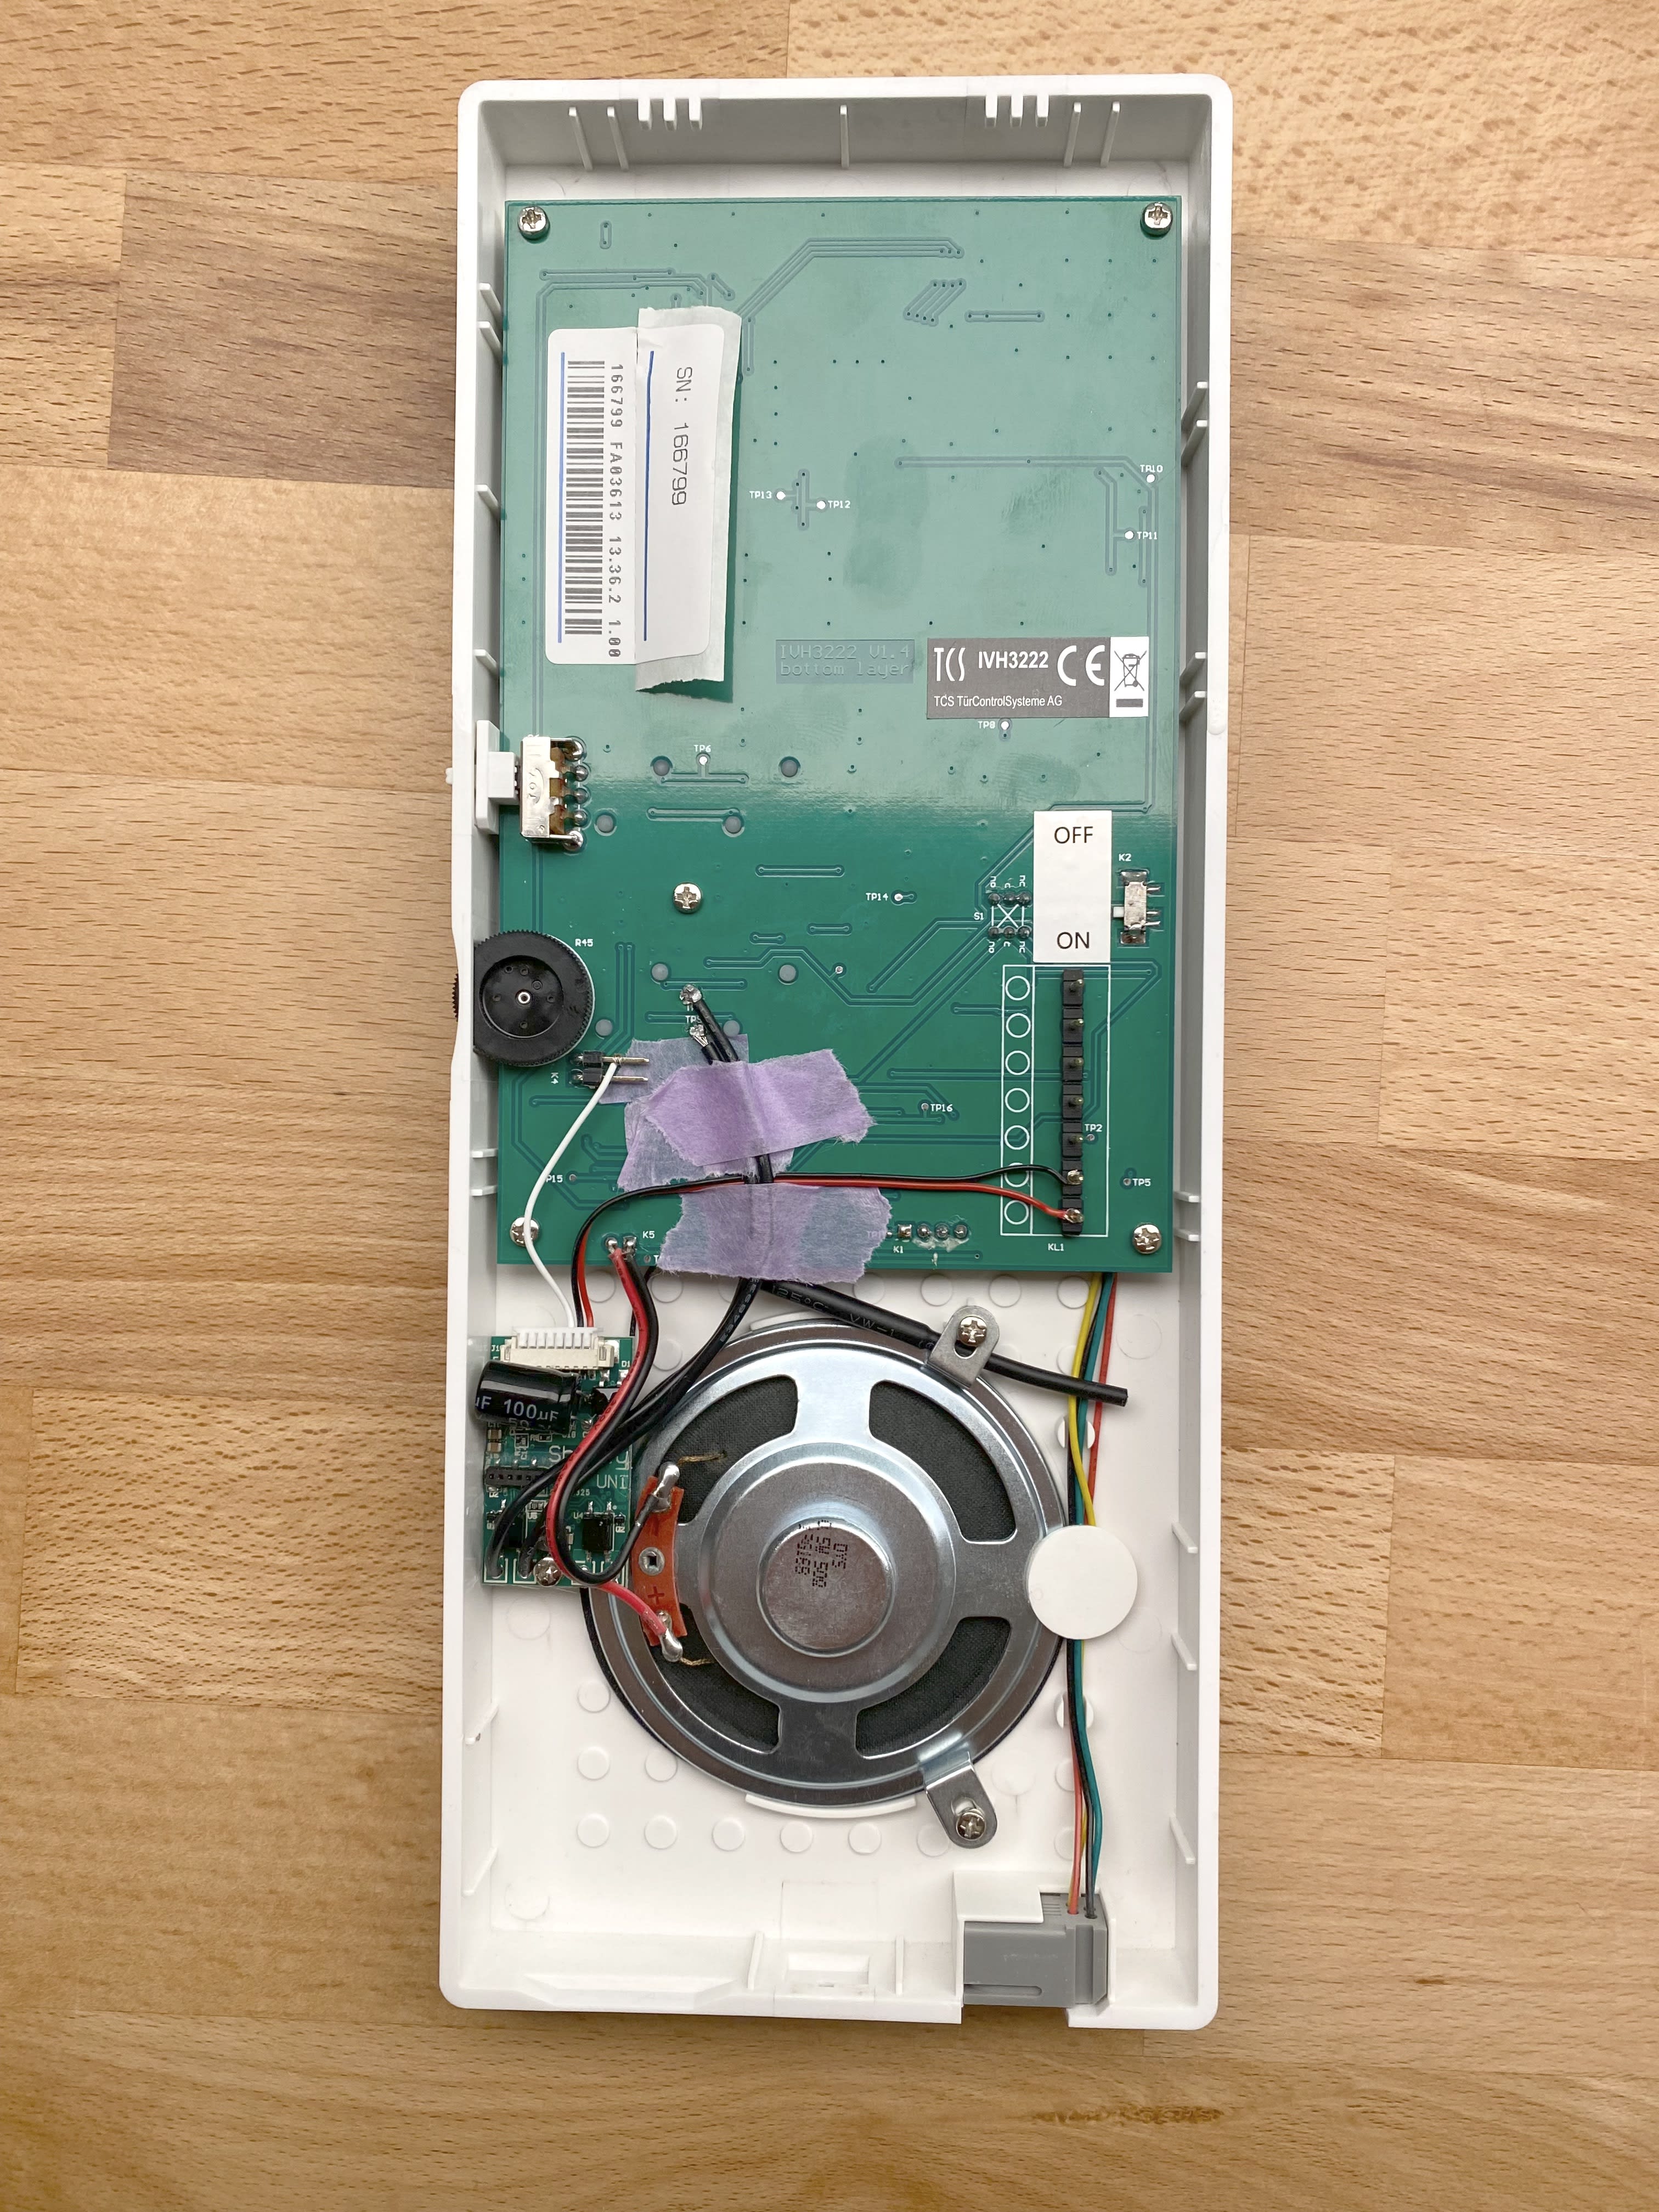
One of my main concerns was that my existing video intercom system uses digital 6-wire technology to communicate, which could make tapping into the system complicated. Since I wanted to have different mobile notifications sent depending on which doorbell was rung (and not just notify everybody about any doorbell), I chose to start my work at one of the intercom units. For reference, my TCS brand system consists of two IVH3222-0140 intercom units and a AVC11020-0010 door unit, which are powered by a VBVS05-SG control unit.
There was already a lot I could learn from the installation guide:
- of the six wires of the intercom, only those labeled
a,b, andPare interesting to us; the other wires are either unused or carry digital signals acarries voltage at 24V DC, but drops to 21V during intercom operation, it is rated to provide 60mAPcarries voltage at 26V DC, it is rated to provide 600mAbis the common ground
After opening up the unit and inspecting the PCB (printed circuit board), I spotted several small test points on the board; I found that bridging the points labelled TP7 and TP9 had the same effect as pressing the buzzer button. This meant that I needed to install a relay to close the circuit and remotely trigger the buzzer.
I also learned that TCS offers a small extension module called TRE1-EB/1, which is a basic relay that can be used to control devices such as an external gong; according to the spec sheet, the module attaches to two extension pins on the PCB (however, there’s only one wire going from the plug to the module and the plug doesn’t seem to have an orientation, so theoretically, the two pins should both do the same thing except maybe the plug bridges the two pins—hard to say without ordering the module 🤷). Measuring the voltage across the upper extension pin and the b wire, I found that when the doorbell is pressed, it briefly rises from ~0,08V to ~1V. This voltage increase is probably meant to trigger the extension module relay, so I needed an ADC (analog-to-digital converter) to listen for this increase and to find out if somebody rang the doorbell.
Putting it all together
Looking at my checklist of features (relay, ADC, powered by 24V DC, Internet connectivity for sending mobile notifications), I researched IoT devices I could put into/next to the intercom. Luckily, I didn’t need a specific smart home integration since the project could be viewed in isolation from the rest of the home (also, I want to wait for the Matter standard to gain traction before investing in a serious smart home setup). Since all intercom locations were reachable via WiFi, there was no need for an ultra-wideband setup or other kind of bridge.
After some searching, I discovered the €13 Shelly Uni, which literally checked all the boxes 😍. The software and service of the company were said to be mediocre at best, but the hardware was praised in all reviews. Nothing short of magic, it packs a WiFi antenna, two (!) relays, an ADC and various sensor inputs in a form factor that fit inside the intercom, and on top of that it accepts an uncanny range of different voltages. Best of all, the Uni was in stock at my local home improvement store, so I immediately went out and (knowing my success rate at soldering) bought two of them (this turned out to be a good decision, because about ten minutes into the project I destroyed one of them 🤦 (I wanted to change the direction in which the antenna cable pointed away from the PCB and pulled carefully on the coaxial plug, but the plug was obviously glued to the socket, which broke off the PCB)).
I started by de-soldering the pre-installed wires of one of the two relays since I only needed one. Next, I looked for a good spot within the intercom to put the Uni so that all its wires could reach their destination—I decided to attach it using one of the intercom speaker’s screws.
For power, I attached the Uni’s 1 and 2 cables to the P and b connectors of the intercom (given that one Uni draws about 20mA, I didn’t want to overburden the 60mA output of a listed by the specification and rather used the 600mA P connector). I attached the Uni’s 3 cable to the upper extension pin and soldered the remaining relay’s two wires to TP7 and TP9 (this ended up being a pretty messy job because the test points were not keen on being soldered to 😬).
The moment of truth
The way the Uni works is that when initially powered on it creates a WiFi network of its own, through which it can be configured to connect to the Internet (not as fancy as the nello’s photodiode-powered setup process but nonetheless pretty amazing given the device’s tiny size).
Anyway, I put everything back together and stared at the WiFi list on my phone. Nothing. The red LED of the Uni was on, but according to the manual, it should be blinking, indicating setup mode. After restarting and pressing the Uni’s reset button without any results, I tried to connect 1 to a instead of P. I honestly have no idea why, but this solved the problem 🤷 (maybe the Uni got too little current even though P is rated higher than a? Too much current? We may never find out. Also, apparently the voltage drop from 24V to 21V during intercom operation doesn’t kill the Uni, which is good.). Here’s the final result (alternate caption: Things you don’t want to randomly find in your intercom 😄):

Configuration
Configuring the software part was mostly straightforward, however, the Uni actually showed up in the Shelly app as two devices since it has two relays and two switch inputs. The first thing I got working was triggering the door buzzer via the phone app and home screen widget; the secret behind this is to
- identify the correct relay (I think in my case, the second device listed in the app was actually the relay labeled OUT1 🙈)
- set Settings > Button Type to Activation Switch
- set Timer > Auto off to 1 second
The ADC bit was a pain to figure out; both of the devices listed in the app had ADC actions and automation options in the settings and I could configure a setup where the door would buzz automatically when I rang the doorbell (which is cool but not what I wanted). I tried around a lot before realizing that while both devices listed had ADC options, only one of the devices offered ADC Detection for automation scenes 🤯. Shelly doesn’t really offer a lot of documentation here, so this part was very much trial and error:
- choose to add a new scene to a room
- add condition > trigger-based > choose room
- now the important part: choose the device that has the ADC exposed; this is best done by experimentation
- if after choosing a device you don’t see ADC Detection, choose the other one
- set ADC Detection > When ADC voltage is more than to 0.2V
- set condition type to once, valid for 0.2 minutes (so you will get notified at most every 12 seconds)
- add a phone notification action
As a finishing touch, I isolated the Uni from my home network to prevent any cyber attacks due to the rather basic nature of the device. The device can easily be shared with other Shelly Cloud accounts, however, this only works for the buzzing in part, mobile notifications can only be set up for the main account 🥲.
Update: Some days after I finished the project, I noticed that the audio connection of the other intercom unit in the first floor was unusable due to high-pitched noise. Apparently, the way I was measuring voltage at the ADC interfered with the analog circuitry in some way, everything was normal again when I disconnected the 3 cable, but I lost the ability to get notified about doorbell presses. As an alternative, I decided to order the €40 TCS TRE1-EB relay add-on to use as an input for the Uni.
In the meantime, my own intercom started to produce high-pitched noise without any obvious reason, which made the whole setup useless 😞. Since my electronics knowledge is not good enough to figure out the reason for the interference, I started to poke around with my multimeter again, looking for an alternative solution. I noticed that the voltage between P and M is also 24V—I immediately looked at all the technical info sheets, but there was no mention of the M wire’s purpose, all instructions just mentioned using P/b 🙈. Anyway, it worked and the Uni powered up just fine 🤩!
After installing the TRE1-EB relay, the final solution to the whole puzzle is to connect
1toPand one of the relay’s outputs2toM8to the other relay output- the relay’s power input to
aandb - the relay’s trigger input to the upper extension pin of the intercom
By the way, the Uni’s 8 pin is switch input number 2—it enables a bonus feature: it can be configured via the app to automatically trigger the Uni’s OUT1 [sic] relay when pressed, turning the configuration into an automatic door opener for parties and such.
Conclusion
In addition to it being an entertaining and educative hobby project, I’m very satisfied with the outcome, probably more than I would have been with any of the existing solutions. Up until now, the system has proven very reliable; no batteries to charge or replace and no multi-national company spying on me either.
As for the future of this project, I’m considering installing a camera with two-way audio at the doorway, e.g. the Ubiquiti G5 Dome—this way, I could get notified when somebody rings, check for deliveries dropped off at my doorstep, remotely talk to guests, and even buzz them in—the full 360° of front door features, with just the right amount of hacking 😄.

