A couple of years ago, after building many WordPress websites, I learned about static site generators. Using them is like putting together static websites (how it all started in the early 90s) but with the advantages of a more advanced web development ecosystem and tooling in place.
In this article I’d like to share my go-to approach for building a modern static website. In order to follow along, you should be familiar with HTML, TypeScript, React, and Node.js. Additional requirements are accounts at GitHub, Contentful, and Netlify.
This is not a detailed guide about the inner workings of Next.js, Contentful, or Netlify (they each have their own great docs), but about how these tools and technologies play together, especially when it comes to using Next.js with TypeScript. I used the following versions when writing this article:
- Node 16.14
- Next.js 12.1
- TypeScript 4.5
In a follow-up article—CMS-Driven Content Structure for a Static Next.js Site—I describe how I create and organize Contentful components in a way that the client has flexibility when creating the website’s content and still maintain control over the design and the overall site structure as a developer.
The basic website setup
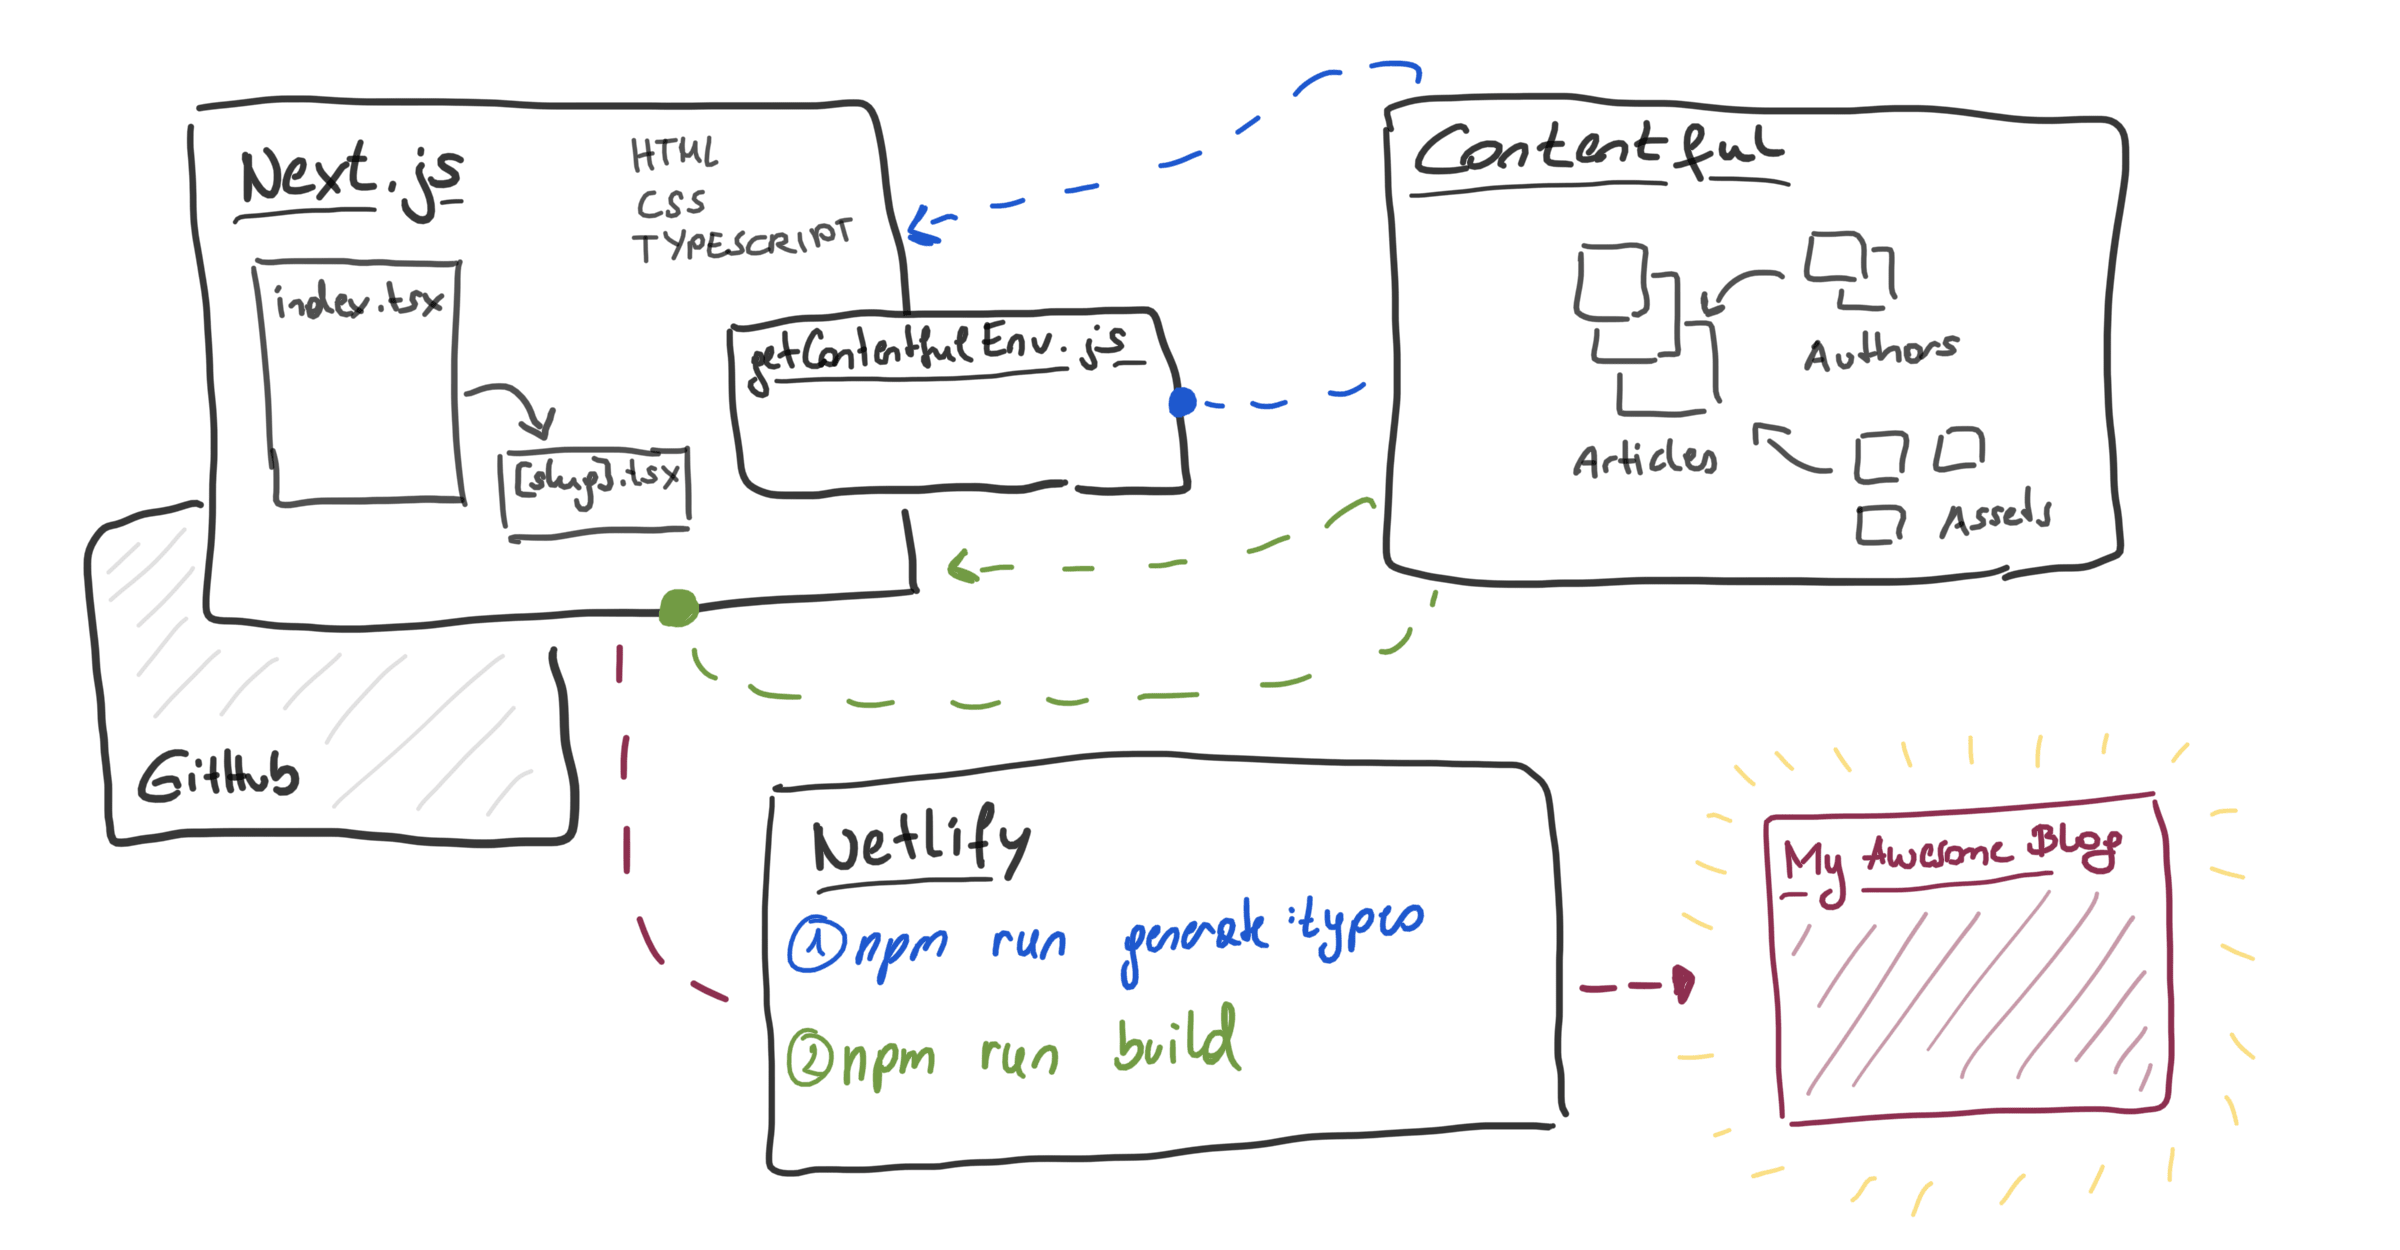
Here's a quick overview of how the technologies and tools mentioned above play their part in this tutorial:
- Next.js is a React development framework that is going to statically generate our website. It contains files for all the pages we want to build as well as other configuration.
- TypeScript is a set of tools on top of JavaScript that (usually) makes a developer’s life easier. Next.js has built-in TypeScript support.
- Contentful is a headless content management system (CMS). This means that in comparison to common CM systems like WordPress, it is not tightly coupled to the website’s rendering process (that’s why we use Next.js), but rather a space for content creation and management only.
- GitHub is a place where we can publish and store the code of our Next.js website using Git. This is required, because in the last step of this guide…
- Netlify is going to access this website’s code and take care of the build step, the step needed to tell Next.js to do its magic: fetch the content from Contentful, and build a static website.
- Node (and its npm package manager) is required to set up the project and install additional dependencies required for the website.
Creating a Next.js site
For this guide, I am going to build a small blog example website with an article overview on the homepage and a detail page for each article.
It all starts with a new Next.js project. In their documentation you can find a getting started guide which we are going to follow along. So we open a terminal (command line) and enter:
npx create-next-app@latest --typescript
We add the TypeScript flag because we want to use TypeScript in the project because TypeScript is cool! 😎 (More about that later…)
In an interactive Next.js setup you need to provide a name for your app; I chose my-nextjs-website. And well… that’s it! It’s really that easy to create a new Next.js website.
Creating a GitHub repository

Before we are going to have a closer look at the code, we create a GitHub repository for the site so Netlify can grab the code to build and deploy it for us.
So let’s go to github.com and create a new empty repository with the same name as the Next.js project (my-nextjs-website). When this is done, go back to your terminal and type cd my-nextjs-website to change your current working directory to the newly created folder. Conveniently, this project already is a Git repository, so we just need to add our GitHub repository as a remote and push the first commit. Replace <your-user-name> with your GitHub username!
git remote add origin git@github.com:<your-user-name>/my-nextjs-website.git
git push -u origin main
Edit the index page

Now that all the preparation is done, let’s move to the fun part and start the development server by typing npm run dev into the command line.
Open your browser and go to localhost:3000. We’re going to turn this welcome page (generated from pages/index.tsx) into an overview of all blog articles. To focus on the project setup we’re not going to add any custom styling for now. Let’s update the page title and headline as well as the description in the head and the body of our page:
<Head>
  <title>My awesome Harry Potter blog</title>
  <meta
    name="description"
    content="This is a blog with many interesting articles about Harry Potter."
  />
  <link rel="icon" href="/favicon.ico" />
</Head>
<h1 className={styles.title}>
  Welcome to my Harry Potter blog!
</h1>

<p className={styles.description}>
  This is a blog with many interesting articles about Harry Potter.
</p>
After updating the pages/index.tsx file you should see the text changes in your browser. 🎉
Creating a content type in Contentful

The next step will be the setup of an article content type in Contentful. I assume that you’ve already created an account and a new space for your blog website. Navigate to “Content model” and add a new content type. We call it Article and make sure that the “Api Identifier” is article.
Each article needs a title, a slug, a subtitle, a publish date, and content. (Later you can add additional fields like author, image, a category, and more, but for now we keep it as simple as possible.) Let’s create these fields with the following settings:
- Title: a text field with the field ID
title, it’s a short text that represents the “Entry title” and it is required. - Slug: a text field with the ID
slug; it’s required and must be unique (see Validation settings) and in the “Appearance” settings select the “Slug” option and make sure the slug is created using the entry title field. - Description: similar to title except the “Entry title” setting; the field ID should be
description - Publish date: this is a required date & time field with the ID
publishDate; in the Appearance settings you change the format to “Date only” - Content: this should be a rich text field with the ID
contentand it’s required as well.
For my Harry Potter blog, I’m going to add a few articles about each book and its plot to have some test data to work with.
Generating type information
Back in our Next.js app we need to fetch the data from Contentful in order to build our homepage and article pages. But first we want to make sure that we have proper types for our Contentful content model available in the frontend.
Why types and TypeScript?
Next.js supports TypeScript out of the box, and we want to make use of that. TypeScript is great because it helps you to avoid a lot of errors by adding type syntax to JavaScript. Every time we fetch data from Contentful and work with the properties, we want to be able to rely on types and interfaces we generated based on the content model.
For a small blog, this might not sound like a necessity—however, once the project reaches a certain size or when returning to a project after some time, going the extra mile and using TypeScript right from the start will pay off soon.
Preparing the environment
We need to set up a few things to continue; first, install the following packages as devDependencies:
contentfulcontentful-managementcontentful-typescript-codegen(documentation on GitHub)dotenv
npm i -D contentful contentful-management contentful-typescript-codegen dotenv
Create a .env file in the root of your project and add the following values:
- Space ID: you find the space ID in “Settings > General”
- Access token: go to “Settings > API keys” and add a new API key; get the
Content Delivery API - access token - Management token: go to “Settings > API keys” and switch to the “Content management tokens” tab; generate a personal token and make sure to immediately copy it
- Environment: You can set up multiple environments, but this is another story. We use the default for now.
CONTENTFUL_SPACE_ID=<your-space-id>
CONTENTFUL_ACCESS_TOKEN=<your-access-token>
CONTENTFUL_MANAGEMENT_TOKEN=<your-management-token>
CONTENTFUL_ENVIRONMENT=master
Important note: Make sure to add this .env file to your .gitignore as we don’t want to expose sensitive data in a GitHub repository!
The next file we’re going to edit is the package.json file. Let’s add a new script we can run to actually generate the types. Add the following entry to the scripts block:
"scripts": {
  // ...
  "generate:types": "contentful-typescript-codegen --output src/@types/contentful.d.ts"
}
There’s one last piece missing: a getContentfulEnvironment.js file in the root folder of the project. The content of this file should be as follows:
const contentfulManagement = require("contentful-management");
require("dotenv").config();

module.exports = function () {
  const contentfulClient = contentfulManagement.createClient({
    accessToken: process.env.CONTENTFUL_MANAGEMENT_TOKEN,
  });

  return contentfulClient
    .getSpace(process.env.CONTENTFUL_SPACE_ID)
    .then((space) => space.getEnvironment(process.env.CONTENTFUL_ENVIRONMENT));
};
Those with a keen eye may notice this is a plain JavaScript file—for small scripts like this, sometimes the effort of adding types outweighs the benefits. 😊

Run the script!
We have everything we need, let’s generate the interfaces representing our article we created earlier in Contentful. Execute the following in your command line:
npm run generate:types
Wait a few seconds… 🥁 Ideally, you should now find a file called contentful.d.ts in a src/@types folder containing interfaces describing the article fields.
import { Asset, Entry } from "contentful";
import { Document } from "@contentful/rich-text-types";

export interface IArticleFields {
  /** Title */
  title: string;

  /** Slug */
  slug: string;

  /** Description */
  description: string;

  /** Publish date */
  publishDate: string;

  /** Content */
  content: Document;
}

export interface IArticle extends Entry<IArticleFields> {
  sys: {
    id: string;
    type: string;
    createdAt: string;
    updatedAt: string;
    locale: string;
    contentType: {
      sys: {
        id: "article";
        linkType: "ContentType";
        type: "Link";
      };
    };
  };
}
Fetching data from Contentful
We now have a Next.js site, some articles in Contentful, and interface definitions that tell us exactly how the data we fetch from Contentful is structured. The next step is to actually fetch and display the data.

Contentful service
I like to put code I’m probably going to use more often into helper functions. Let’s create a file src/util/content-service.ts with the following content:
import { createClient } from "contentful";
import { config } from "dotenv";

/*
 * We tell TypeScript that those environment variables are always defined.
 * If you want to learn more about this madness, read:
 * https://www.typescriptlang.org/docs/handbook/declaration-merging.html#module-augmentation
 */
declare global {
  namespace NodeJS {
    interface ProcessEnv {
      CONTENTFUL_SPACE_ID: string;
      CONTENTFUL_ACCESS_TOKEN: string;
    }
  }
}

config();

export default class ContentService {
  static get instance() {
    return new ContentService();
  }

  client = createClient({
    space: process.env.CONTENTFUL_SPACE_ID,
    accessToken: process.env.CONTENTFUL_ACCESS_TOKEN,
  });

  async getEntriesByType<T>(type: string) {
    return (
      await this.client.getEntries<T>({
        content_type: type,
      })
    ).items;
  }
}
The index page
On the index page, we are going to replace the cards from the tutorial page with our articles. Look for the Next.js documentation about data fetching with getStaticProps for more details about what we’re going to do next. In short, we need to export a special function that fetches data from our headless CMS at build time. Go to pages/index.tsx and update the file as follows:
// imports on top

// The props for our page component
interface Props {
  articles: IArticleFields[];
}

const Home: NextPage<Props> = ({ articles }) => {
  // return the page's content
  // we are going to take care of this in a minute
};

export default Home;

export const getStaticProps: GetStaticProps<Props> = async () => {
  const articles = (
    await ContentService.instance.getEntriesByType<IArticleFields>("article")
  ).map((entry) => entry.fields);

  return {
    props: {
      articles,
    },
  };
};
This is the part where we add typing to the NextPage and fetching all content elements using the article type. The articles’ fields are returned as props to the page component. Within the index page we can now access all articles.
Look for the <div className={styles.grid}>. We are going to remove all the cards and replace them as follows:
<div className={styles.grid}>
{articles.map((article) => (
<a key={article.slug} href={`/${article.slug}`} className={styles.card}>
<h2>{article.title} →</h2>
<p>{article.description}</p>
</a>
))}
</div>
Thanks to TypeScript, we now know that title, description, and slug are properties of the article type and that they are strings. Without the types it’s just remembering and guessing, which are both forms of cognitive overhead and tend to make you slower as a developer.
Pro-tip: The anchor (<a>) tag could be replaced with the Next.js Link component, which adds some bells and whistles like client-side transitions and prefetching.
Remove the footer as we don’t need it at the moment. All the code pieces combined in the pages/index.tsx page now look like this:
import type { GetStaticProps, NextPage } from "next";
import Head from "next/head";
import { IArticleFields } from "../src/@types/contentful";
import styles from "../styles/Home.module.css";
import ContentService from "../src/util/content-service";
interface Props {
articles: IArticleFields[];
}
const Home: NextPage<Props> = ({ articles }) => (
<div className={styles.container}>
<Head>
<title>My awesome Harry Potter blog</title>
<meta
name="description"
content="This is a blog with many intersting articles about Harry Potter."
/>
<link rel="icon" href="/favicon.ico" />
</Head>
<main className={styles.main}>
<h1 className={styles.title}>Welcome to my Harry Potter blog!</h1>
<p className={styles.description}>
This is a blog with many intersting articles about Harry Potter.
</p>
<div className={styles.grid}>
{articles.map((article) => (
<a
key={article.slug}
href={`/${article.slug}`}
className={styles.card}
>
<h2>{article.title} →</h2>
<p>{article.description}</p>
</a>
))}
</div>
</main>
</div>
);
export default Home;
export const getStaticProps: GetStaticProps<Props> = async () => {
const articles = (
await ContentService.instance.getEntriesByType<IArticleFields>("article")
).map((entry) => entry.fields);
return {
props: {
articles,
},
};
};
The result in the browser looks like this for me:

The article page
When clicking on one of these card links on the homepage, we want to go to an article details page that contains all the content (which we still need to build).
In our ContentService let’s add a function that gets an entry based on its slug:
export default class ContentService {
  //...

  async getArticleBySlug(slug: string) {
    return (
      await this.client.getEntries<IArticleFields>({
        content_type: "article",
        "fields.slug": slug,
      })
    ).items[0];
  }
}
Next, we add a file [slug].tsx to the pages folder. It should contain:
- A page component that renders the article
- A
getStaticPropsfunction that fetches the given article - A
getStaticPathsfunction that defines paths to be generated for the dynamic[slug]path param
The basic file structure looks as follows:
import type { GetStaticProps, NextPage } from "next";
import Head from "next/head";
import { IArticleFields } from "../src/@types/contentful";
import ContentService from "../src/util/content-service";
import styles from "../styles/Home.module.css";

interface Props {
  article: IArticleFields;
}

const Article: NextPage<Props> = (props) => {
  // return the page content
  // coming soon
};

export default Article;

export const getStaticProps: GetStaticProps<
  Props,
  // This is the match for the [slug] path param
  { slug: string }
> = async (ctx) => {
  // get article by slug
};

export const getStaticPaths: GetStaticPaths = async () => {
  // define a list of paths
};
Let’s have a closer look at getStaticProps:
export const getStaticProps: GetStaticProps<Props, { slug: string }> = async (
  ctx,
) => {
  const { slug } = ctx.params!;
  const article = await ContentService.instance.getArticleBySlug(slug);

  if (!article) {
    return { notFound: true };
  }

  return {
    props: {
      article: article.fields,
    },
  };
};
The getStaticPaths function fetches all articles and returns the slugs of each one. As slug is a required field we can assume that it’s always available. Thanks to TypeScript for helping us out here! 🙏
export const getStaticPaths: GetStaticPaths = async () => {
  const articles =
    await ContentService.instance.getEntriesByType<IArticleFields>("article");

  return {
    paths: articles.map((article) => ({
      params: {
        slug: article.fields.slug,
      },
    })),
    fallback: false,
  };
};
Finally, let’s update the page content to display a nice article. In order to be able to render our rich text field for the article’s content, we need to install one last package.
npm i -D @contentful/rich-text-react-renderer
In the pages/[slug].tsx file we need to add some code to the page component. For the sake of simplicity and because the blog’s design is not in focus for this guide I’m going to reuse the homepage’s stylesheet and add two CSS rules to styles/Home.module.css:
.article {
  max-width: 780px;
  line-height: 1.5;
}

.publishDate {
  font-size: 0.875rem;
  color: #808080;
}
This is the final code for the [slug].tsx article page:
import { documentToReactComponents } from "@contentful/rich-text-react-renderer";
import type { GetStaticPaths, GetStaticProps, NextPage } from "next";
import Head from "next/head";
import { IArticleFields } from "../src/@types/contentful";
import ContentService from "../src/util/content-service";
import styles from "../styles/Home.module.css";

interface Props {
  article: IArticleFields;
}

const Article: NextPage<Props> = ({
  article: { title, description, publishDate, content },
}) => (
  <div className={styles.container}>
    <Head>
      <title>{title} | My awesome Harry Potter blog</title>
      <meta name="description" content={description} />
    </Head>

    <main className={styles.main}>
      <h1 className={styles.title}>{title}</h1>
      <p className={styles.description}>{description}</p>
      <time dateTime={publishDate} className={styles.publishDate}>
        Published on {publishDate}
      </time>

      <div className={styles.article}>{documentToReactComponents(content)}</div>
    </main>
  </div>
);

export default Article;

export const getStaticProps: GetStaticProps<Props, { slug: string }> = async (
  ctx,
) => {
  const { slug } = ctx.params!;
  const article = await ContentService.instance.getArticleBySlug(slug);

  if (!article) {
    return { notFound: true };
  }

  return {
    props: {
      article: article.fields,
    },
  };
};

export const getStaticPaths: GetStaticPaths = async () => {
  const articles =
    await ContentService.instance.getEntriesByType<IArticleFields>("article");

  return {
    paths: articles.map((article) => ({
      params: {
        slug: article.fields.slug,
      },
    })),
    fallback: false,
  };
};
Here’s a screenshot of my article page. (Admittedly, I didn’t write all this on my own, but copied the content from Wikipedia.)

Deploy the site on Netlify

When our website is ready, we don’t want to hide it away on our computer, but bring it online and show it to the world! We are going to use GitHub and Netlify to accomplish this one last task.
We need to add another script to our package.json file for triggering a production build:
"scripts": {
  // ...
  "build:prod": "npm run generate:types && next build && next export"
}
Push all changes to your GitHub repository (make sure to not push the .env file containing all Contentful access tokens!).
I assume that you already have a Netlify account and are logged in. On your empty sites overview, click “Import from Git” (or create a new site in case you already have created some sites). Follow the instructions on how to connect to GitHub and pick your Next.js website’s repository.
When it comes to the build settings we need to update some values:
- the build command is:
npm run build:prod - the publish directory is:
out
Click on “Show advanced” to find more build settings and add the environment variables we defined above in our .env file here:
CONTENTFUL_SPACE_IDCONTENTFUL_ACCESS_TOKENCONTENTFUL_MANAGEMENT_TOKENCONTENTFUL_ENVIRONMENT
When everything’s ready click “Deploy site”!
Build error
When I started the build for the first time, I ran into an error because Netlify automatically installed the “Essential Next.js” plugin for me. You can either follow the instructions: If you are using "next export" then you should set the environment variable NETLIFY_NEXT_PLUGIN_SKIP to "true". or remove the plugin in the plugins tab, which did the trick for me.
So here we are, looking at our Next.js blog built with React & TypeScript fetching its content from Contentful and hosted on Netlify! 🥳
Trigger a build on content update
When you commit changes to your repository in GitHub, the build on Netlify gets triggered automatically. To also trigger a build when your content gets modified, create a build hook for the site in Netlify by going to “Site settings > Build & deploy > Build hooks”. In Contentful, go to “Settings > Webhooks”, find the Netlify webhook template in the sidebar, click “Add”, enter the build hook URL, and click “Create”. Done! 🎉
Summary
This is what we did, summarized again step by step:
- Created a Next.js app using
create-next-app - Created an article content type in Contentful
- Installed extra packages required to fetch the data from our CMS:
contentful,contentful-management,contentful-typescript-codegen,dotenv - Added environment variables for connecting the Next.js site with the Contentful space
- Created a
getContentfulEnvironment.jsfile and aContentServicewith two helper functions to fetch entries by type and by slug - Updated the
index.tsxfile with an article overview includinggetStaticProps - Created a
[slug].tsxfile for the article detail pages includinggetStaticPropsandgetStaticPaths - Added two scripts to the
package.jsonto generate types and interfaces based on our Contentful content model (generate:types) and trigger a production build (build:prod) - Pushed the project to GitHub
- Created a new site on Netlify using the GitHub repository
- Added a webhook to trigger the Netlify build when content changes
It took me some time to find out how Next.js plays together nicely with TypeScript and Contentful. I use the approach described in this article in some of my website projects already, and I’m happy that I now have a guide how to set everything up when I start building the next one. 😊
When you stumble across this tutorial, and it helps you in setting up your project, or you have additional thoughts and improvements, let me know on Twitter!
By the way, I wrote a follow-up article about a CMS-driven content structure for a static Next.js site—check it out!